Exposing a K8s App Behind CGNAT on a Multi-Node, Bare Metal Raspberry Pi Cluster
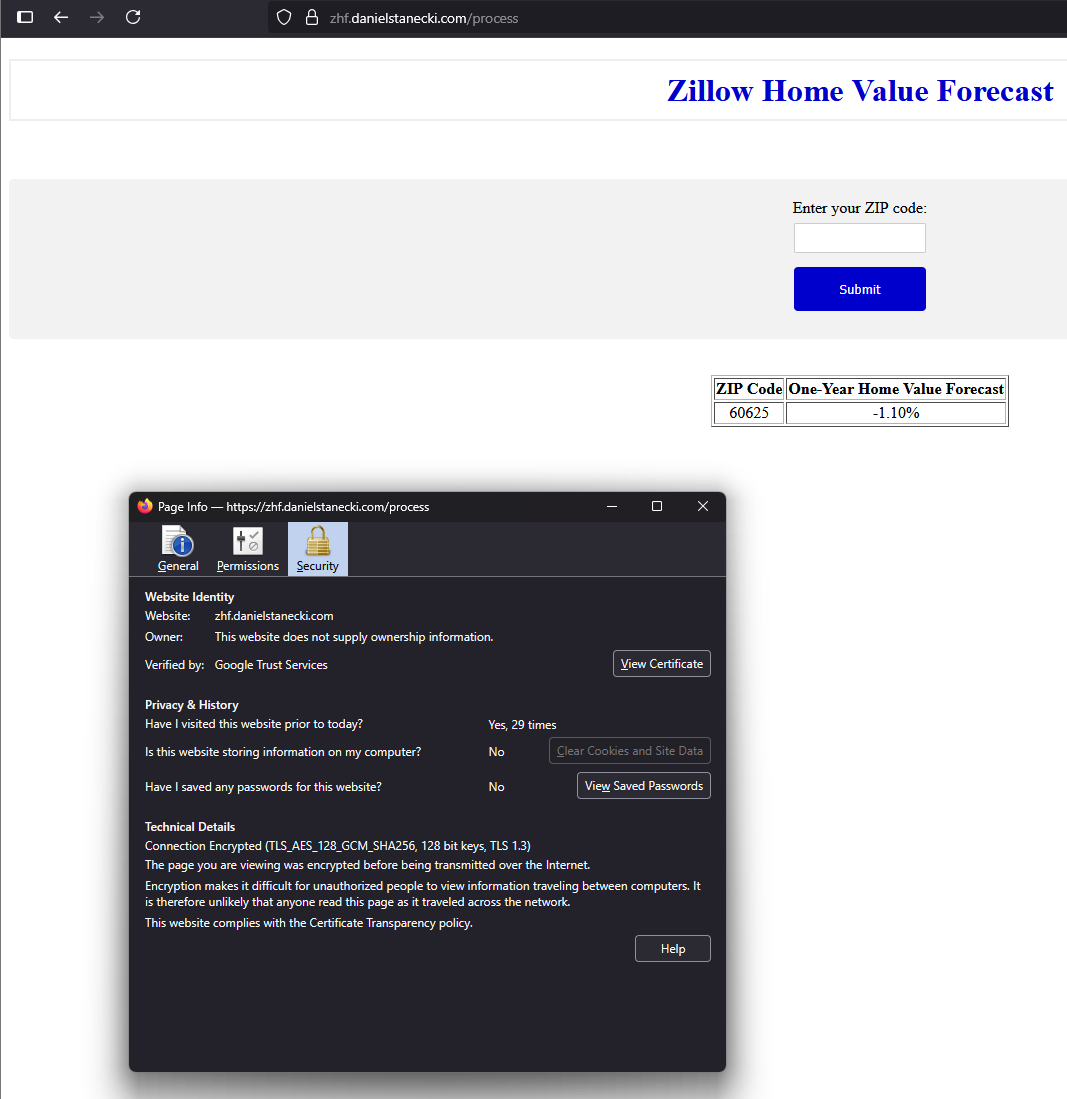
A step-by-step guide to serving a Kubernetes app over HTTPS using Traefik, cert-manager, and Cloudflare Tunnel — without a public IP, on bare metal Raspberry Pis. (Zillow Housing Forecast: zhf.dstanecki.com)
When I moved into my new apartment, I brought my Raspberry Pi K8s cluster with me, planning to expose it publicly. Except I missed one small detail: the apartment didn’t have a coaxial outlet for traditional internet. I had to get a wireless 5G router which uses CGNAT (Carrier-Grade NAT) – a method used by ISPs to conserve public IPv4 addresses by having multiple customers share a single public IP. You can’t assign a public IP to your load balancer if you don’t have your own to begin with. That wrecked my plan to expose my app via MetalLB and Traefik. Here’s how I worked around it.
 |
|---|
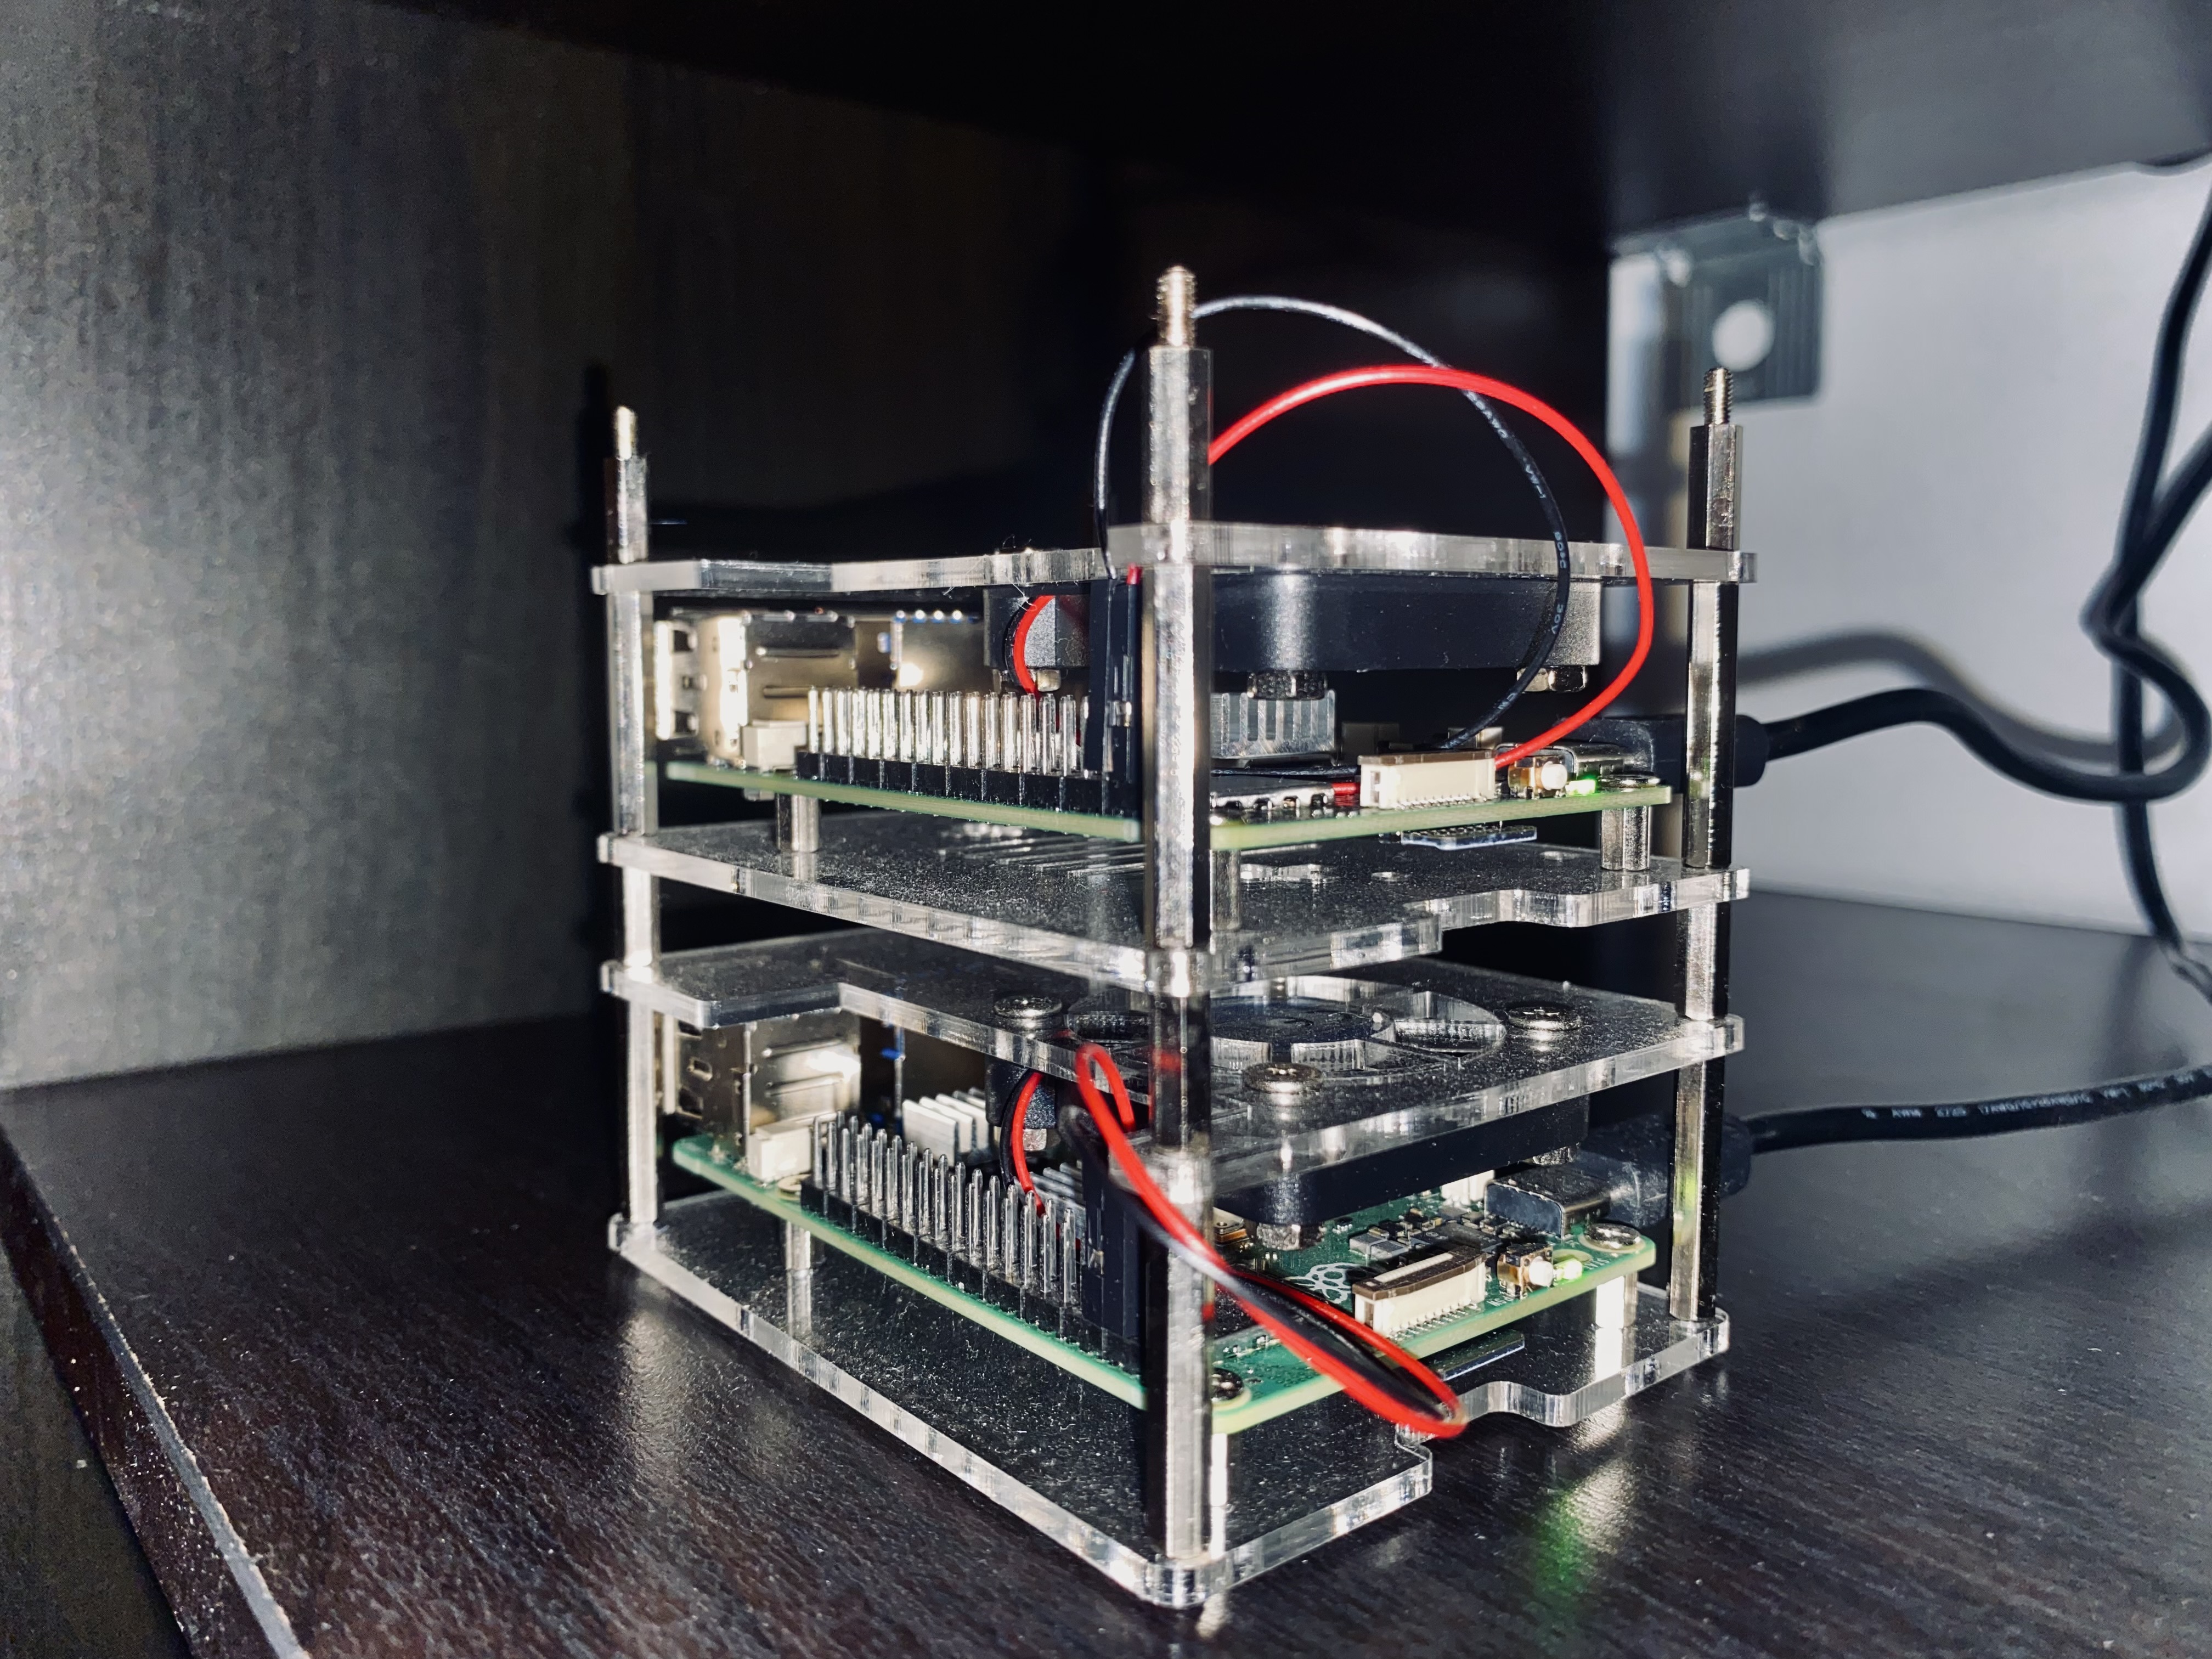
| My Raspberry Pi Server Rack |
What Doesn’t Work
I racked my brain for workarounds. Public IPv6 address? Nope – not allowed with this 5G wireless router. Set up a site-to-site VPN to a cloud provider and use a cloud load balancer? Maybe, but I wanted to keep everything bare-metal and easily reproducible. Not only that, but my primary motivation for doing this project on Raspberry Pis was to avoid ongoing costs of cloud infrastructure.
I had already been using a Tailscale private mesh network to connect my Raspberry Pis with my laptop, since I like to SSH to them remotely if I need to. This was actually a lifesaver for me, since I was using PiVPN (OpenVPN) with my old router which allowed port forwarding, but of course this new wireless 5G router does not. While Tailscale does offer a service called Funnel, which can expose your private service to the internet, it restricts you to using a subdomain.ts.net and is not compatible with CNAME. I found this out the hard way when my CNAME setup kept throwing an SSL error for no apparent reason. Funnel is still in Beta, so limitations like this aren’t clearly documented yet.
Luckily, there are two other services that allow you to get past CGNAT restrictions and let you use your own domain name: Ngrok and CloudFlare Tunnel.
Ngrok vs CloudFlare Tunnel
CNAME Support
- CloudFlare Tunnel is free and supports custom CNAME records (as long as you delegate your domain to their nameservers)
- Ngrok has a free-tier but custom CNAME support will run you about $10/month (but no domain transfer required)
TLS Certificate Options
- Ngrok requires paid plan for both Ngrok-managed certs for your CNAME and for using self-managed certs (e.g. LetsEncrypt) to achieve TLS passthrough
- CloudFlare will let you manage your own cert in the Free Tier. (Optionally you can pay for a managed cert)
End-to-End TLS Encryption
- Ngrok supports end-to-end encryption if you configure it that way
- CloudFlare Tunnel doesn’t support true end-to-end encryption and terminates TLS at their servers (I guess this is how they turn a profit, they offer certain features for free in exchange for our data)
Security Features
- CloudFlare Tunnel has built-in DDoS protection and web application firewall for free
- Ngrok does not
FINAL VERDICT
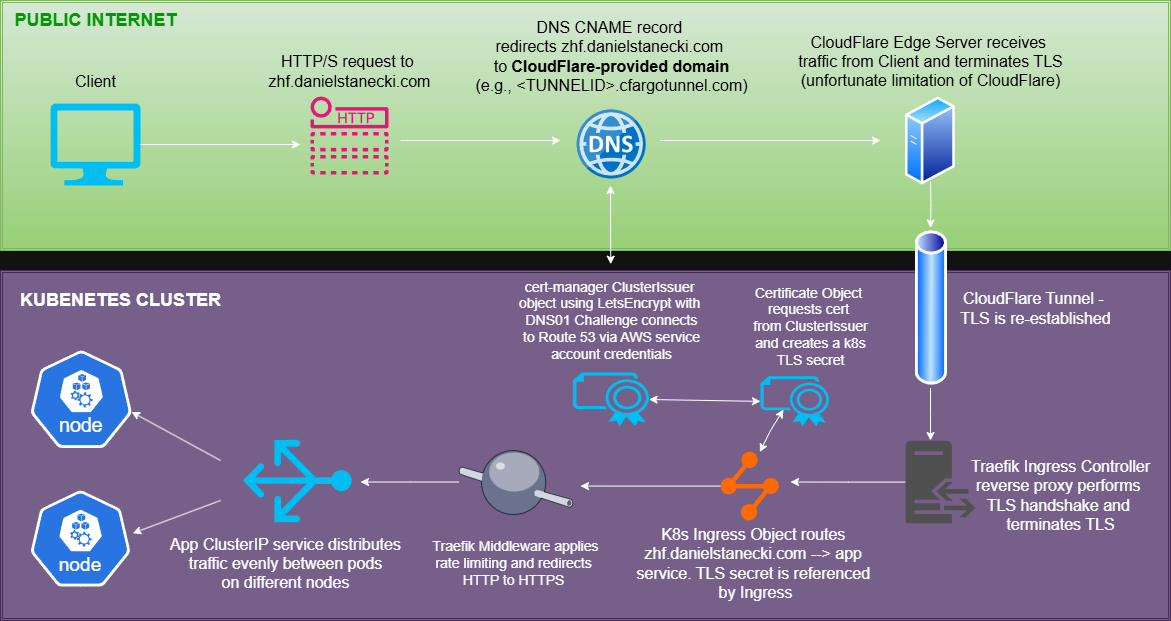
For my use case, I would prefer to stay free tier and I also want CNAME support, so I’m going to choose CloudFlare Tunnel. I’ll have to delegate my Route 53 domain to CloudFlare. I’m also going to generate my own TLS cert with cert-manager + LetsEncrypt for the cost savings. Due to the limitations of CGNAT and the nature of CloudFlare Tunnel, I will be using a DNS-01 challenge instead of HTTP-01.
Steps
Architecture of Let’s Encrypt + Traefik Reverse Proxy + Cloudflare Tunnel setup
Prerequisites:
- An existing K8s web app with a frontend service
- Traefik
- cert-manager (kubectl apply -f https://github.com/cert-manager/cert-manager/releases/download/v1.18.0/cert-manager.yaml)
- CloudFlare account
- Domain name delegated to CloudFlare nameservers
- Install the cloudflared agent and follow tunnel setup instructions from the docs. You can specify the number of replicas, ensure that you have enough across different nodes for HA – ideally using antiAffinity rules.
- Associate your domain with the tunnel and make sure that your domain nameservers are delegated to CloudFlare’s servers.
- Internal app-service needs to be ClusterIP (as opposed to NodePort which is what I was using to expose my app internally), and Traefik service needs configuration as follows:
    - name: websecure
      port: 443
      protocol: TCP
      targetPort: 443
      # targetPort defaults to "websecure" which works if
      # Traefik was installed by Helm and correctly mapped the port.
      # But I ran into problems with k3s managing Traefik regarding
      # this targetPort mapping so I prefer to specify 443 and make that persist via a HelmChartConfig.
- Create a CloudFlare API Token with Zone:DNS:Edit permission for your domain (will be used for the DNS-01 Challenge)
- Copy the access keys and create a kubectl secret
  kubectl create secret generic cloudflare-api-token-secret \
    --from-literal=api-token=<your-token> \
    -n cert-manager
- Create a ClusterIssuer
  apiVersion: cert-manager.io/v1
  kind: ClusterIssuer
  metadata:
    name: letsencrypt-prod
  spec:
    acme:
      email: <YOUR_EMAIL>
      server: https://acme-v02.api.letsencrypt.org/directory
      privateKeySecretRef:
        name: letsencrypt-prod
      solvers:
      - dns01:
        cloudflare:
          apiTokenSecretRef:
            name: cloudflare-api-token-secret
            key: api-token
- Create a Certificate Object (default duration is 90d, cert-manager will auto-renew after 60d)
  apiVersion: cert-manager.io/v1
  kind: Certificate
  metadata:
    name: zhf-tls
    namespace: default
  spec:
    secretName: zhf-tls
    issuerRef:
      name: letsencrypt-prod
      kind: ClusterIssuer
    commonName: zhf.danielstanecki.com
    dnsNames:
      - zhf.danielstanecki.com
- (Optional) Create a Middleware object with rate-limiting and HTTP header rules. It’s good to have this extra layer of security on top of what CloudFlare already provides. Be sure to apply this object in the same namespace as your Ingress.
  apiVersion: traefik.io/v1alpha1
  kind: Middleware
  metadata:
    name: secure-middleware
  spec:
    chain:
      middlewares:
        - name: redirect-to-https
        - name: security-headers
        - name: rate-limit
  ---
  # Redirect HTTP to HTTPS
  apiVersion: traefik.io/v1alpha1
  kind: Middleware
  metadata:
    name: redirect-to-https
  spec:
    redirectScheme:
      scheme: https
      permanent: true
  ---
  # Add Secure HTTP Headers
  apiVersion: traefik.io/v1alpha1
  kind: Middleware
  metadata:
    name: security-headers
  spec:
    headers:
      browserXssFilter: true
      contentTypeNosniff: true
      frameDeny: true
      sslRedirect: true
      stsSeconds: 31536000
      stsIncludeSubdomains: true
      stsPreload: true
      referrerPolicy: "no-referrer"
      customFrameOptionsValue: "SAMEORIGIN"
  ---
  # Rate Limiting
  apiVersion: traefik.io/v1alpha1
  kind: Middleware
  metadata:
    name: rate-limit
  spec:
    rateLimit:
      average: 100
      burst: 50
- Create an Ingress with websecure entrypoint and reference the Certificate
  apiVersion: networking.k8s.io/v1
  kind: Ingress
  metadata:
    name: zhf-tls-ingress
    annotations:
      traefik.ingress.kubernetes.io/router.entrypoints: websecure
      # You would use below annotation with a Traefik Middleware object:
      #
      # traefik.ingress.kubernetes.io/router.middlewares: secure-middleware@kubernetescrd
  spec:
    ingressClassName: traefik
    rules:
      - host: zhf.danielstanecki.com
        http:
          paths:
            - path: /
              pathType: Prefix
              backend:
                service:
                  name: app
                  port:
                    number: 5000
    tls:
      - secretName: zhf-tls
        hosts:
          - zhf.danielstanecki.com
- Apply the objects and the cert will be issued automatically and begin DNS-01 Challenge which can take a few minutes.
watch kubectl get challenges -n kube-system
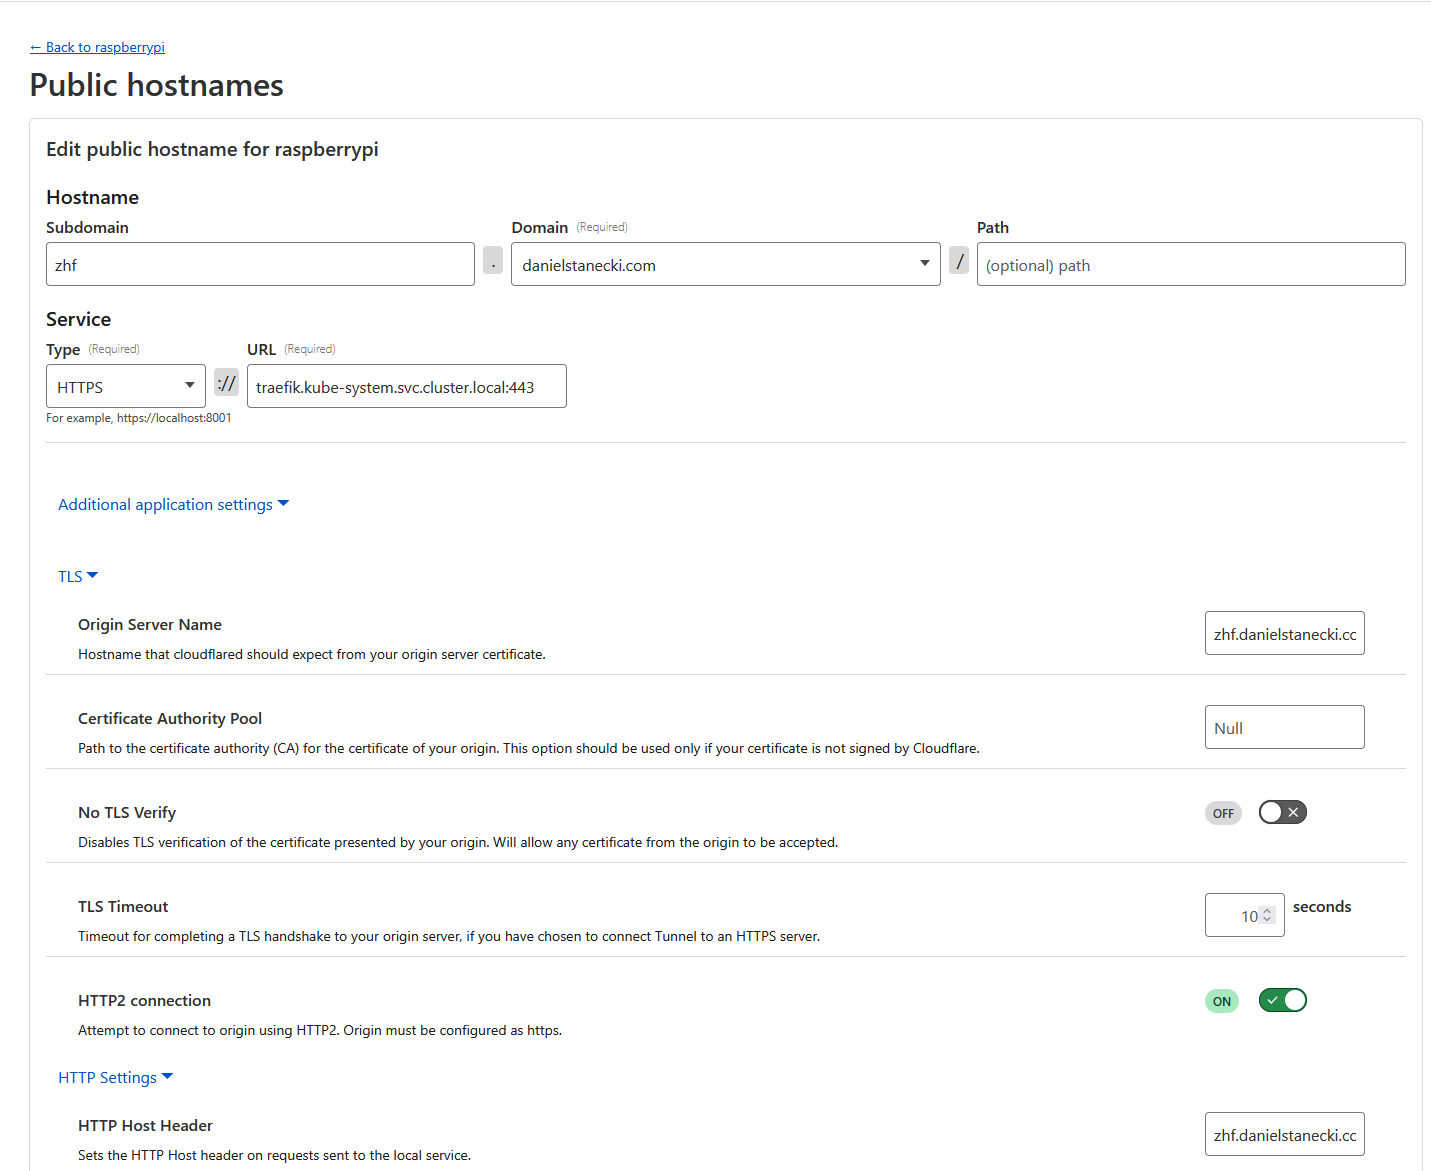
- Configure CloudFlare Tunnel
- Point your domain to https://traefik.default.svc.cluster.local:443 (if in default namespace)
- Specify Origin Server Name, NO TLS Verify, enable HTTP2 since that’s fully supported by Traefik
- Enforce “Always Use HTTPS”
- If done right, your web application will serve over HTTPS only.